Exporting a Grid
All grids in DbVisualizer can be exported to file, clipboard or into the SQL Commander using a number of formats.
The Export wizard gives you full control over the export (there is also an option to open the grid as a spreadsheet using predefined settings). The commands are available both on the right-click menu and on the toolbar and operate on either selected, visible, or all data:
- Export Visible: visible data, observing any sorting, filtering or hidden columns that reduce the contents of the grid
- Export: all data loaded into the grid (ignoring filters and sorting)
- Export Selection: data in selected cells


Settings
The first wizard page is the Settings page, containing general properties for how the exported data should be formatted.

Select an output format, file encoding (it is also used to set the encoding in the HTML and XML headers, if you select one of those formats), and values for some different data formats (date, time, et.c.).
Note that the text to the right of the selections in the Data Format section shows an example of how the currently selected option would look like with real data.
Excel export do not support formatted date, time or timestamp. To get the correct date format in Excel you either have to export dates as text (check the Export Date/Time as Text) or set the format explicitly in Excel.
Only in DbVisualizer Pro
With the DbVisualizer Free edition, only the CSV and HTML formats are supported.
The Options section is used to define settings that are specific for the selected output format, for instance the column and row delimiters for the CSV format, or the Excel spreadsheet format.
Data page
Clicking the Next button in the wizards moves you to the Data page. Use the columns list to control which columns to export and how to format the data for each columns. The list is exactly the same as the column headers in the original grid, i.e., if a column was manually removed from the grid before launching the Export Wizard, then it will not appear in this list.

The Table Rows fields show you how many rows are available and let you specify the number of rows to export. This setting along with the Add Row button is especially useful when you use the test data generation feature described in the next section.
The columns in this page's grid can be used like this.
| Column | Descriptions |
|---|---|
| Export | Defines whether the column will be exported or not. Uncheck it to ignore the column in the exported output. |
| Name | The name of the column. This is used if exporting in HTML, XML, XLS, JSON or SQL format. Column headers are optional in the CSV output format. |
| Label (Alias) | When you export a result set grid for a SELECT statement that uses column aliases, this column holds the alias. If you have also enabled Use any Label (Alias) in the Options section, this value is used in place of the name. |
| Type | The internal DbVisualizer type for the column. This type is used to determine if the column is a text column (i.e., if the data should be enclosed by quotes or not). |
| Is Text | Specifies if the column is considered to be a text column (this is determined based on the type) and so if the value should be enclosed in quotes. |
| Value | The default ${value}$ variable is simply be substituted with the column value in the exported output. You can enter additional static text in the value field. This is also the place where any test data generator variables are defined. |
Generating Test Data
The test data generator is useful when you need to add random column data to the exported output.
The Value column in the Data page grid specifies the data to be in the exported output. By default, it contains the ${value}$ variable, which is simply replaced with the real column value during the export process. You can also add static values before and after the ${value}$ variable, to be exported as entered.
Alternatively, you can use test data generator variables in the Value column. The choices are available in the right-click menu when you edit the Value column.
| Function Name | Function Call | Example |
|---|---|---|
| Generate random number | ${var||randomnumber(1, 2147483647)}$ | Generates a random number between 1 and 2147483647 |
| Generate random string of random size | ${var||randomtext(1, 10)}$ | Generates random text with a length between 1 an 10 characters |
| Generate random value from a list of values | ${var||randomenum(v1, v2, v3, v4, v5)}$ | Picks one of the listed values in random order |
| Generate sequential number | ${var||number(1, 2147483647, 1)}$ | Generates a sequential number starting from 1. The generator re-starts at 1 when 2147483647 is reached. The number is increased with 1 every time a new value is generated. |
Here is an example of how to use the test data generators to try out planned changes to the data. Consider this initial data:
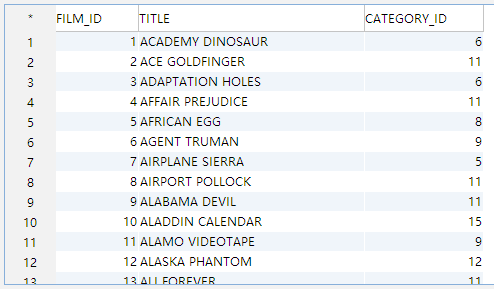
After the changes, the CATEGORY_ID column should not appear in the output and the new CATEGORY_CODE should contain abbreviated category codes. To test this, we simply uncheck the Export checkbox for CATEGORY_ID entry and set the Value for the CATEGORY_CODE to use the Generate random value from a list of values function (${var||randomenum(DRAMA, ACTION, THRILLER, COMEDY, SCI_FI)}$).
By unchecking the "Export" checkbox for the column CATEGORY_ID this column will not be included in the export.

Preview
The third wizard page is the Preview page, showing the first 100 rows of the data as it will appear when it is finally exported. This is useful to verify the data before performing the export process. If the previewed data is not what you expected, just use the back button to modify the settings.
Previewing the data (or exporting it) in CSV format results in this:

Output Destination
The final wizard page is the Output Destination page. The destination field specifies the target destination for the exported data, one of File, SQL Commander or Clipboard.

Click Export on this page to export the grid data to the selected destination.
Settings Menu
If you often use the same settings, you can save them as the default settings for this assistant. If you use a number of common settings, you can save them to individual files that you can load as needed. Use the Settings drop-down button menu to accomplish this:
- Save as Default Settings Saves all format settings as default. These are then loaded automatically when open an Export Schema dialog
- Use Default Settings Use this choice to initialize the settings with default values
- Remove Default Settings Removes the saved defaults and restores the regular defaults
- Load... Use this choice to open the file chooser dialog, in which you can select a settings file
- Save As... Use this choice to save the settings to a file
- Copy Settings to Clipboard Copies the settings to the system clipboard
You can also use settings saved here with the @export client side command.